Archive for March 24, 2014

Vroooom

There isn’t really any story behind this.


I have a joystick module, and it would be pretty simple to hook it up to a motor and use it for a remote control car.


I decided on a few parameters:

  • No microcontroller. Where’s the challenge in that?
  • Joystick wired directly to the car. Wireless can be a stretch goal, this is supposed to be a really quick project.
  • Front/back on the stick will drive 12v DC motors with variable duty cycle PWM for speed control while keeping torque high

This is a reasonably complicated analog circuit, and I really do prefer to simulate my numbers when I do that, just to make sure that I have a valid starting point for real-world tweaking.

I’m not really that keen on diving into SPICE (especially LTspice, which would be my only option, at the moment), but a cursory Internetting around came up with CircuitLab. Now, I’m not normally one to plug some commercial service without very good reason, but this service is seriously pretty great. It’s an online, cloud-based schematic editor and simulator.

I’ve been playing off and on with online services for five or six years, but really nothing has been any good.  But this one is really intuitive, free for non-commercial use, and they don’t even nag me about buying anything, even after detecting that I have an adblocker.


But anyway. I may or may not build this, it was mostly an op-amp and 555-hysteresis exercise.

Here’s the first stage, with a potentiometer(R5) controlling the op-amp output voltage. Varying the voltage adjusts the control voltage that the capacitor is allowed to charge to, causing the output duty cycle to change.

DC Motor - Single stage


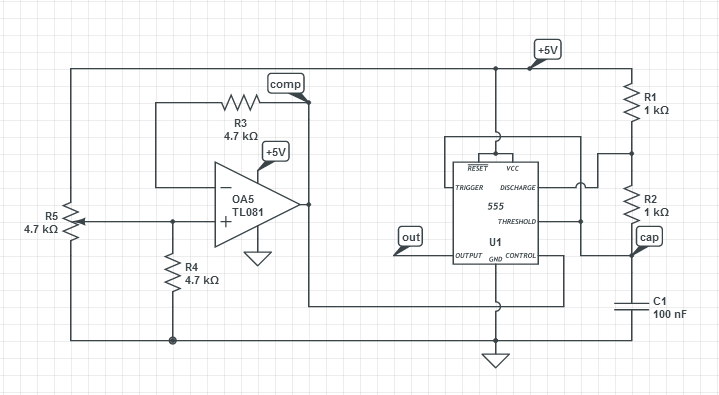
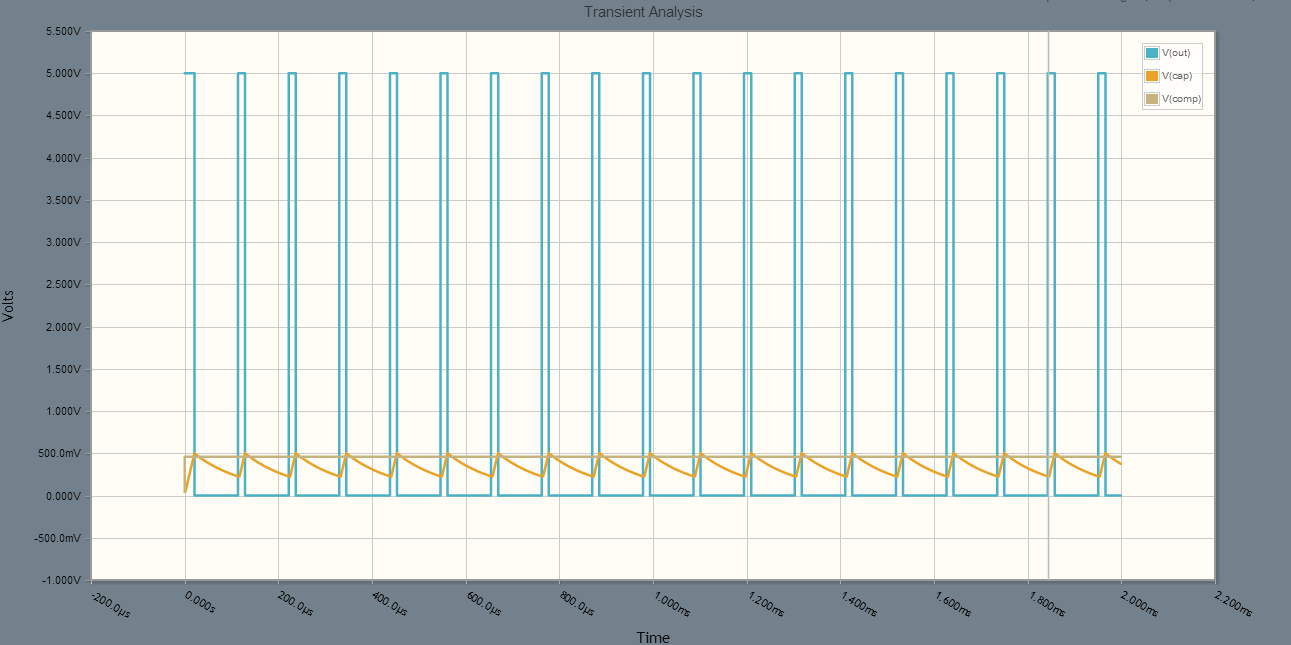
Here’s a steady-state simulation of R5 low, PWM output (and therefore DC motor speed) low:

DC Motor Transient Low

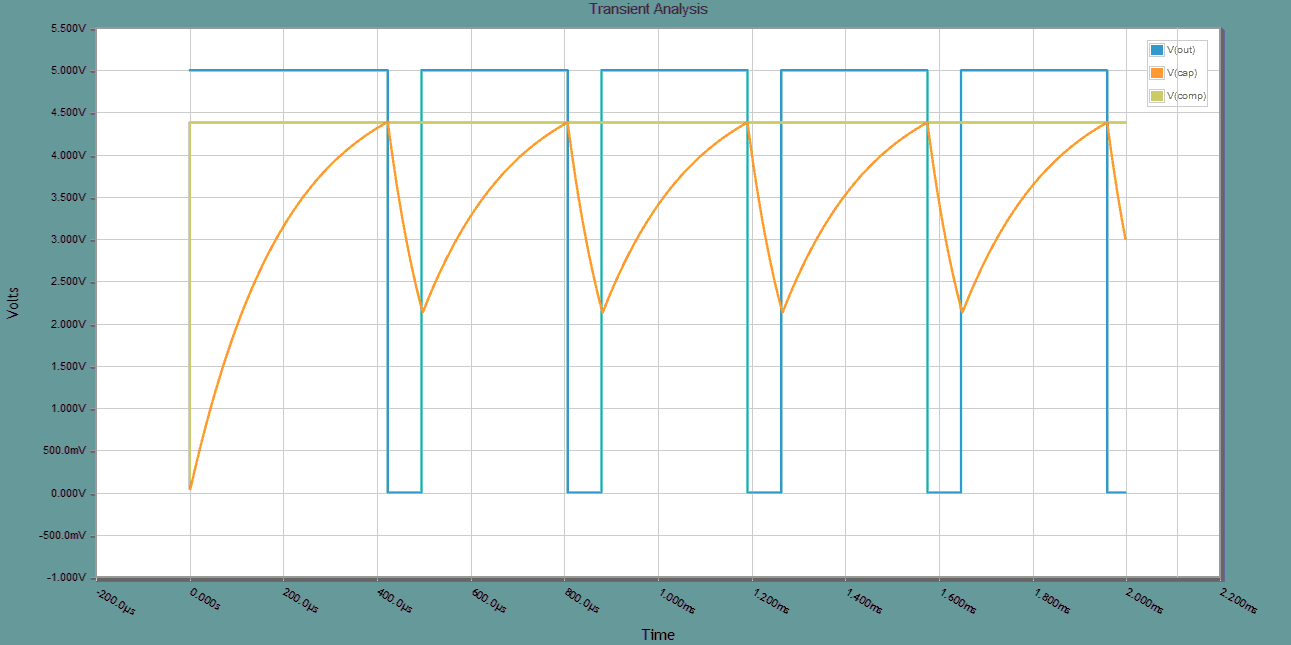
R5 high, PWM output high:

DC Motor Transient High


Perfect.


That’s only half the battle, though. I need to get two inverted PWM signals coming off a single potentiometer, centred around the middle.

Part of the challenge of that is that you can’t just duplicated the above circuit. When the pot is involved with both high side(for controlling forward) and low side(for backwards), the circuits are somewhat in parallel.

Some small resistors to ground where needed to mitigate that. Eventually, I got a gorgeous graph that looks like this:

DC Motor Sweep

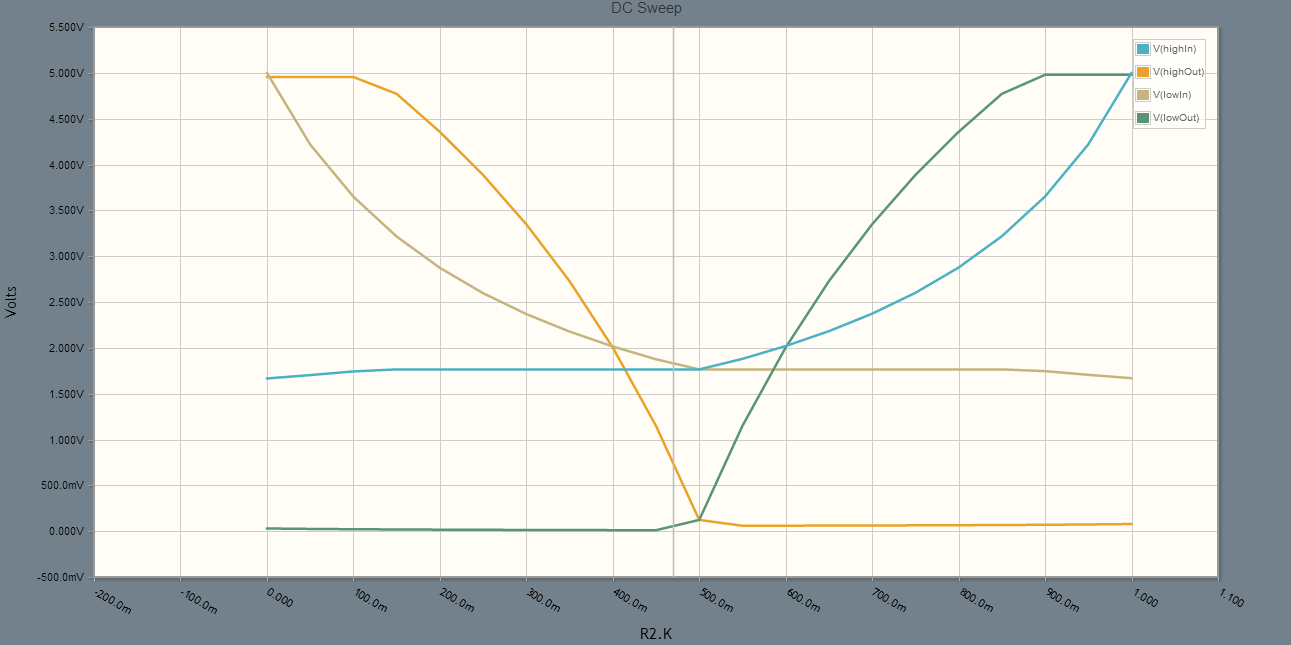
The important takeaway here is that the output voltage at the joystick-centred position is effectively nil for both sides. Each one respectively ramps up when the potentiometer is shifted to their side.

The 555 output stages aren’t in this simulation because they don’t change from the first circuit.

Here’s the second circuit:

DC Motor Full Schematic


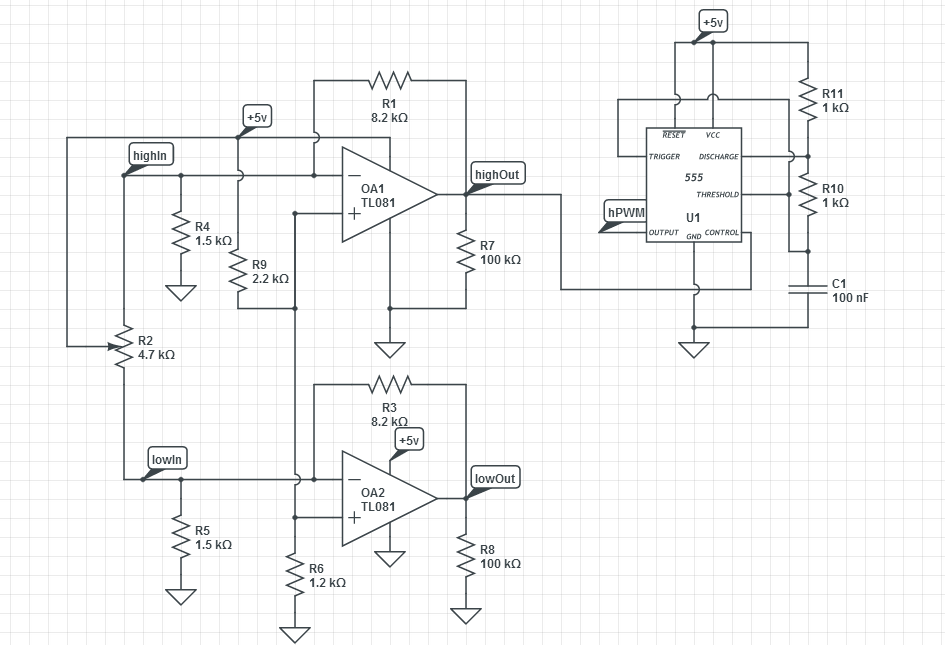
The low-side 555 circuit isn’t shown either because again, doesn’t change.

A couple more notes:

  • I’d actually be driving this circuit with 12v, but capacitor charging rates are all relative, so the timing wouldn’t change.
  • Those two resistors to Vcc and GND, R6 and R9 are to adjust the joystick trim.
  • CircuitLab actually has excellent export options, too. I didn’t use them because I like the gridlines.


Again, this project is mostly just a fun simulation exercise. If I’m ever really hard-up for something to build, I’ve got everything written down here so I can do it. That may never happen, though.

Clearing out the backlog

A couple years ago, I started work on a timelapse camera module. I built one board, came up with some corrections, and designed a better version. Then it stagnated for quite a long time.

A few months ago I checked over the files again and sent them off to a fab shop.

After the new boards arrived, I couldn’t find a local source for some of the components I needed and it sat for a long time again.

A few days ago I found some components that would also (mostly) work, so I started the project up again. Let’s get ‘er done.


The goal of the project was to be able to hook into any 2000-era tiny resolution digital camera and take a picture at set intervals. It’s powered by USB, and regulated down to 3.3v that most cameras use. There’s a very simple 7-segment-display-based interface with which to control the timelapse interval.

It’s powered by a PIC microcontroller, and the display is driven by a couple 74HCT164 shift registers by TI. The “HCT” portion of that is key, because these are both wide-voltage range (to be able to run off 3.3v), and fast enough to clock 8 times without visible flicker.


Here’s where I’m at right now:

I don’t have the 3.3v regulator that I designed for, but I found a different one that is adequate, with some bending of pins. None of my capacitors are the right footprint, and I don’t have the right resistor network package. All of these parts are pretty easily available off Newark/Element14, so I’ll have the appropriate parts for my second prototype.


Other than that, it looks pretty good. Keep in mind that I designed this version over a year and a half ago. I’m in a very different place now. Here’s what I would do now (or will do for a redesign):

  • I’ve mostly sworn off resistor network packages.
  • I realize I should have added a couple more decoupling caps.
  • I prefer to use SMD to DIP now.
  • With surface mount, I could also make this whole board much smaller.
  • USB-A male-male cables aren’t really common anymore, it would be much more convenient to use a microUSB port.
  • Driving the camera inputs would probably be safer with a transistor instead of directly from the PIC.
  • I need mounting holes.


I’ve rewritten the software. It stores timer values in EEprom and uses an interrupt to trigger the camera. At a later date, I’ll add in sleep settings for power saving, and control the camera on/off state for the same purpose.


For the interrupt, I want it triggered about every second. It triggers every time the 2-byte Timer1 register overflows. With the maximum prescaling dividing the clock (and register) to one second, I’d have to set the clock speed down to 1MHz. That slows down other parts of the program, enough to make my software-SPI-controlled display have visible flicker. That’s not cool.

To get the proper time, then, I need to count off a bunch of interrupts until I get to 1 second. I’ll calculate a good set of values for Timer1 to do the necessary.

Fosc / 4 = 1MHz

1MHz / 8 prescale = 125kHz

Period = 1 / 125kHz = 8ms

1s / 8ms = 125000 clocks

Say, 125000 / 2 = 62500 clocks

65536 clocks before overflow – 62500 = 3035 starting value (and decrement seconds every other interrupt)

After measuring against a stop watch for two and half minutes, it’s about 3 seconds too fast. That’s 3 / 150 seconds, or about 2%.

So change the starting value to 3035 * 1.02 = 3095.

I’m using the internal oscillator, which tends to be pretty inaccurate. That’s okay, I can tune it. A good way to do that is to take timelapse photos of a clock when I’ve put everything together. I’m curious how much it’ll drift after I calibrate it due to time or temperature. It’ll be an experiment.

Pictures of the build process to follow.


At first, I was lamenting not having proper mounting holes on my PCB. After examining the chassis I had lying around, though, this is perfect. The ribbed interior can hold slices of acrylic, and, properly cut to shape, they’ll sandwich both of the boards, the 7-seg display, and the lens assembly exactly where they need to be. No fasteners, and no unnecessary holes. Perfect.

Reverse engineering those finicky little nylon gears you find in printers

Side note: A summary of something I’ve been using for many hardware hacks in the past while.

A lot of commercial machines use gears for transferring forces. Well, duh. It’s often necessary to change gearing around, though, and it’s nigh-impossible to find commercial solutions with appropriate ratios, tooth profiles, and mounting options. So usually I laser cut my own.

The easiest way to generate a gear that meshes with an unknown is to use Inkscape’s Gear extension. It needs circular pitch, which you find by:

  1. Measuring the gear’s outer diameter, OD
  2. Counting the teeth, N
  3. Getting diametral pitch: (N+ 2) / OD
  4. Calculating circular pitch: Pi / Diametral pitch

For the pressure angle, it’s a little more complicated. You need the base pitch:

  1. Use your digital calipers to measure right down in the gaps of two teeth
  2. Measure three teeth
  3. Subtract the two-teeth measure from the three-teeth one to get a single tooth
  4. Do the same for 5 and 4 teeth
  5. Take an average result of those to get an approximate base pitch measurement
  6. Base Pitch * Diametral Pitch = Pi * Cos(Pressure Angle)

Of course, that looks difficult and error-prone but generally you’ll only run into pressure angles of 14.5 or 20 degrees, so only do rough measurements pick the closest one.


For mounting holes, you’ll need to know how far apart to space them. Pitch diameter is what you need: Teeth / Diametral pitch


This is a quick summary of everything you need to know. There are a lot of dimensions associated with spur gears, and it’s good to know what’s what, but these are the only ones you actually need to make your own. All of these formulas are unitless, so pick and choose, as long as you match the same unit in Inkscape. I uses inches for these, but I tend to switch back and forth to metric with impunity for everything else.

Rapid PCB Prototyping

Like many (many many) engineering types, I have a goal of easy workbench PCB fabrication. I think I’ve done more research than most, however, and in this case, sharing the wealth means everybody wins.

I’ve posted this up here in its original form, but an updated version will live at the VHS wiki so that everyone can join in. So, without further ado, here are avenues I have approached, intend to approach, or discounted.

Objectives

To design a machine, method, or process to generate one-off printed circuit boards with the following conditions:

  1. Time from finished PCB layout to physical board must be less than 3 hours excluding setup.
  2. Traces for TSSOP packages must be possible (0.19-0.3mm traces, 0.65mm pitch).
  3. Two layers must be supported and properly aligned with minimal frustration.
  4. Board quality must be consistent and dependable.
  5. Minimal tool changes or chemicals.

Methods

Traditional

Toner Transfer

Works. Not well.

The traces are laser-printed in reverse onto some sort of glossy paper (e.g. magazine or photo paper), then transferred to a copper-clad board using a hot clothing iron or t-shirt press. The traces transfer to the board and act as an etch-resist.

Issues:

  • A dedicated clothing iron is required
  • Inconsistent transfer (i.e. gaps in solid areas)
  • Multiple layers are difficult to align

UV Exposure

Works. Not well.

The traces are laser-printed onto clear acetate, then overlayed on a copper-clad board and exposed evenly to UV light. The board is then washed in developer solution that either washes away the exposed portions of UV-sensitive chemical, or wash away then unexposed portion, depending on chemical process used. The traces that remain on the board act as an etch-resist.

Issues:

  • UV chemicals are required to coat the board OR
  • Presensitized boards must be used, which are:
  • More expensive
  • Inconsistent from different manufacturers both in exposure time and development time
  • Require handling in a darkroom
  • Require rushing the process so as not to allow ambient light to ruin process.

Laser Cutter

Spray Paint

Has potential.

The board is evenly sprayed with a single coat of paint. After drying, the laser cutter vaporizes the paint along where the traces should go. Remaining paint is left as an etch resist.

Issues:

  • Laser power/speed must be fine-tuned to vaporize paint layer with excess copper heating (cut paths widen when copper acts as a heat-sink).
  • Paint layer is undesirably thick. May not be an issue?
  • Paint layer is difficult to apply evenly.
  • Vaporized paint leaves a residue that interferes with etching. Clean it with hydrogen peroxide or very very mild acetone bath?

Sharpie

Has potential.

Copper-clad is covered in Sharpie (permanent marker ink). Laser appears to “burn in” sharpie layer and make it resistant to acetone. After acetone bath, burnt in layer is left as etch-resist.

Issues:

  • Layer evenness is very difficult to achieve. Ink bath and rubber rollers will be attempted.
  • Acetone bath dilution must be tweaked.

Sugar

Laser printer toner is effectively sugar as a binding agent and carbon as a colourant. Because colour is unnecessary, sugar alone was attempted to be used as an etch mask.

Doesn’t work.

  • Laser cutter has “air assist”, airstream designed to push slag through the workpiece as it is cutting. It blows the sugar off the copper instantly.
  • Using water to form a paste, still difficult to consistently achieve thin traces.

Toner

Doesn’t work. Bad idea. Not dumb enough to try this.

Issues:

  • See above for air assist issues.
  • Nigh-impossible to work with cleanly.
  • Biohazard.

May be do-able on custom laser-diode CNC platform.

Acrylic Trench

Works. Not well.

Laser etch traces into acrylic medium. Fill etched area with conductive paint.

Issues:

  • Thick traces.
  • High trace resistance.
  • Can’t be soldered onto.

Printers

Inkjet

Works. Not well.

Modify printer to print traces directly onto copper-clad. Use as etch resist.

Issues:

  • Typical inkjet ink is a dye as opposed to a pigment and is water-soluble. Ink cartridge must be filled with special MISPRO pigment:
  • Expensive.
  • Messy to refill.
  • Runny/blurry edges.
  • Double sided boards have alignment issues.

Laser

Works. Not well.

Laser printer can be modified to print directly onto copper-clad. Use as etch resist.

Issues:

  • Larger printed areas have inconsistent fill/gaps.
  • Alignment issues for 2-layer boards and multiple passes to fill in gaps.

Wax Inkjet

Works. Current status unknown.

Jeff Gough had some success with this. A piezo inkjet head (as opposed to a thermal inkjet head) used by Epson printers can be modified with a heated reservoir to print directly with wax.

Issues:

  • Print heads eventually had clogging issues.

Dye-Sublimation

Has potential.

Dye-sub is now available for the consumer market with Canon’s Selphy line of printers. It works through a thermal print head sublimating wax or resin into a gas, then allowing to to solidify onto the print medium. It should work as an etch resist.

Potential issues:

  • Sublimation results in soft edges, may lead to improperly etched traces if print resolution is too low.
  • May rely on special coatings on print medium for ink to bind properly.
  • Water insolubility may rely on final clearcoat layer that is printed.

Thermal Transfer

Has potential.

Similar to dye-sub.

Issues:

  • Printers are expensive, niche, and difficult to find in appropriate sizes.

Thermal Wax Transfer

Has potential.

Similar to dye-sub. Replace ink transfer cartridges with wax paper or similar. Thermal print heads should transfer etch resist wax to copper-clad.

Issues:

  • Very likely.

Wax Printer

Has potential.

Some Xerox Phaser printers use a solid wax block as ink. Would work as an etch resist.

Issues:

  • Only available on business lines.
  • Expensive.
  • Huge.
  • May be difficult to modify to accept copper-clad.

3D Printer

Has potential.

Single layer of plastic laid down as etch resist.

Issues:

  • Accuracy?

Mechanical

CNC Milling

Works. Not well.

Issues:

  • Messy.
  • Requires babysitting.
  • Limitations on trace sizes.
  • Endmill bits are expensive.

Vinyl Plotter

Works. Not well.

Issues:

  • Terrible accuracy.
  • Results in the strangest looking PCBs imaginable.

Electrical Discharge Machining

Has potential.

Electrical arc from brass wire to workpiece removes material in a very controlled and accurate manner to isolate traces. Reaction happens in a dielectric such as mineral oil or distilled water.

Issues:

  • Difficult to design machine for precision.
  • Expensive.
  • Terrifying.

Electro-Chemical Machining

Doesn’t work.

Workpiece is set up as an anode while electrode is used as a cathode. Reaction takes place in a conductive electrolyte, such as salt water.

Issues:

  • Extremely inaccurate.